How to Work with the File Manager
File manager is a repository for images, documents, audio recordings, and videos that you upload and send to users via SendPulse. Each service (bulk email service, website builder, and online course builder) has its own storage folder in the respective section.
Let's take a look at how the storage size is calculated and how to work with files.
Storage Capacity
The capacity of your file storage is not defined by the services themselves but is set based on the largest storage capacity allowed by all services’ pricing plans.
For example, the email service’s "Pro" pricing plan offers a 200 MB storage capacity, the website builder’s "Standard" pricing plan offers a 100 MB storage capacity, and the online course builder’s pricing plan offers 1 GB. The largest storage capacity of all these services is 1 GB, which means that you can use 1 GB of storage space in all three services.
Read more: Email Service Pricing Plans, Landing Page Pricing Plans, and EDU Service Pricing Plans.

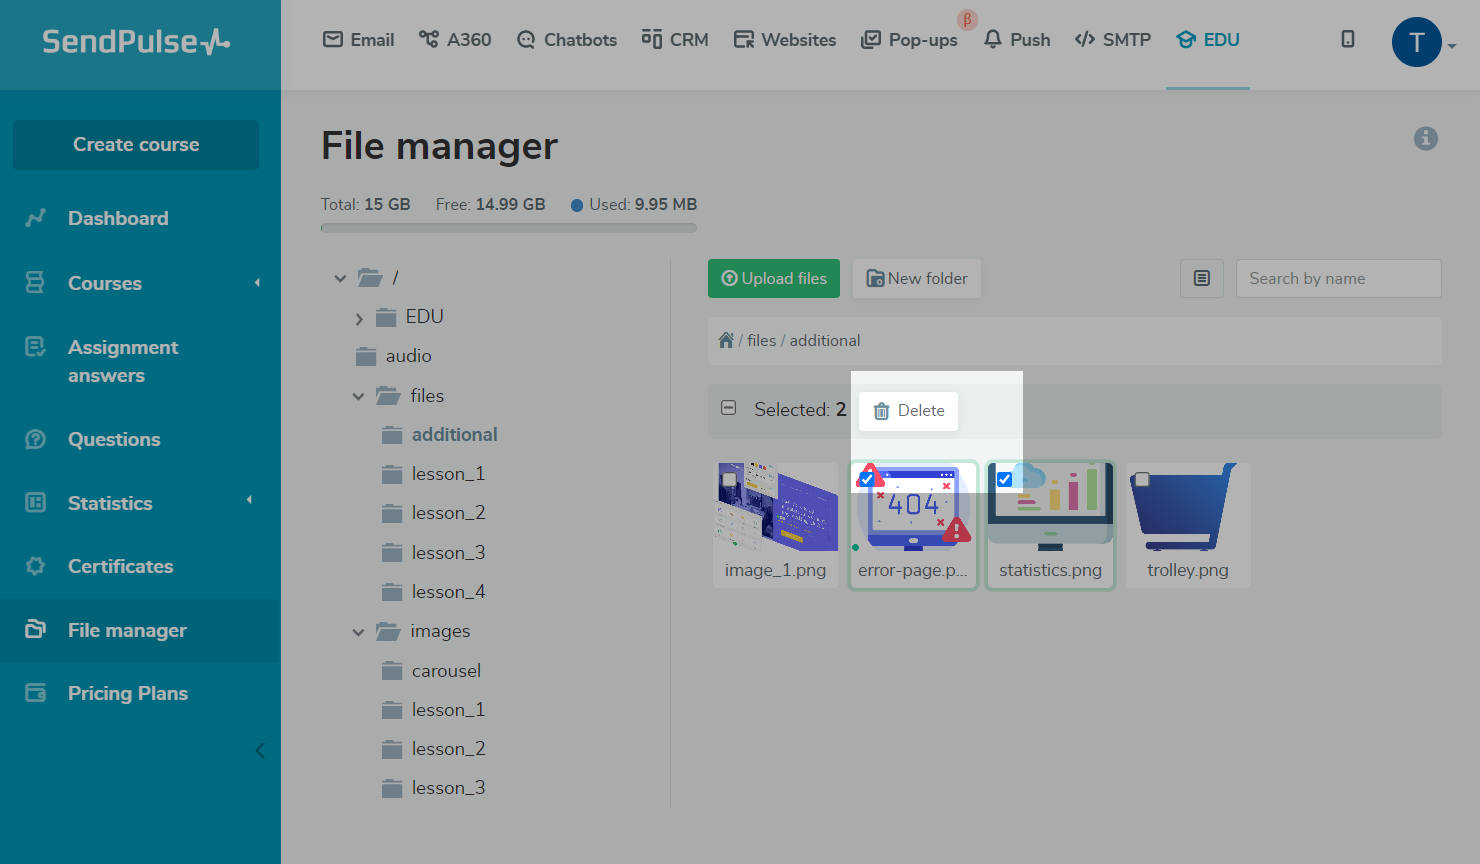
Working with Your Storage
In the file manager, you can upload, rename, download, and delete files and create folders.
View Folder Contents
To open the file manager, go to the "File Manager" tab in the "EDU" section.

The created folders’ structure is displayed on the right.
The "/" folder is the root folder of all services. To go to a subfolder, expand the main folder, and click on the desired folder.

The files and folders selected on the left are displayed on the right.

Use the search box to quickly find a folder or file by its name.

You can display files as a list or gallery.
Gallery view is useful when you want to see file previews.

The list shows additional information such as file size and date added. It also shows folders’ total file size and the date the last file was added.

Create a Folder
To create a new folder, navigate to the directory where you want to create it, and click Create Folder.

Check the path where the folder will be created, enter the name of your folder, and click Create.

Upload Files
To upload a file, navigate to the directory where you want to upload it, and click Upload File.

Check the path where the file will be uploaded. Drag and drop your files, or click on the upload area to select them from your computer.
You can upload files of any format and use them in the lesson builder for the “Image,” “Video,” “Audio,” and “Files” elements. However, you can only use pictures in JPG, JPEG, PNG, BMP, GIF, SVG, and WEBP formats for your course cover and certificate.
There is no individual file size limit, only the size of your available storage space is taken into account.

Click Upload, and wait for the file to be uploaded. You can then close the window.
You can also upload your files directly to the necessary folder in the lesson builder and then manage them in the repository.
Edit Files and Folders
To rename a folder, right-click on it, and select "Edit" in the context menu.

To rename a file, right-click on it, and select "Edit" in the context menu.

Delete Files and Folders
To delete a folder, right-click on it, and select "Delete" in the context menu.

To delete a file, right-click on it, and select "Delete" in the context menu.

To delete multiple files, select them, and click Delete.
Download a File
You cannot open and view a file on the page in the file manager. You can download it and then view it in more detail.
To download a file, right-click on it, and select "Download" in the context menu.

Use Files to Create Your Course
In the lesson builder, you can select your uploaded files in all formats when adding builder elements.
Please note that for the files to be displayed properly, you need to upload them using their respective elements. Upload videos to the "Video" element, include images in the "Gallery: Image" element, add audio recordings to the "Audio" element, and upload files in other formats to the "File" element.

In the course settings, you can choose an image for the course preview in the student's account and a cover image for your course website.

In the certificate settings, you can select a background and additional image.

Last Updated: 27.07.2023
or